Developer Options ADB Hidden Settings Android Tips Debugging Begin 01 / 8 Developer Options How do you unlock the Developer Options menu on most Android devices?
A Android Debug Bridge B Advanced Device Bootloader C Automated Diagnostic Backend D Android Device Broadcaster Correct!
Continue 06 / 8 Developer Options What does the 'Stay awake' option in Developer Options do?
Try AgainHow to enable USB debugging on AndroidIt’s a piece of cakeEnabling USB debugging is an extremely simple process, so let’s just get right to it.
Related Every Android Developer Option Explained Modern Android phones hide a menu called Developer Options.
Android’s hidden Developer Options menu is full of handy toggles and tools. However, there’s one in particular that could genuinely help get you out of a jam. I hope you never need it, but if you do, you’ll be happy you took 5 seconds to enable it right now.
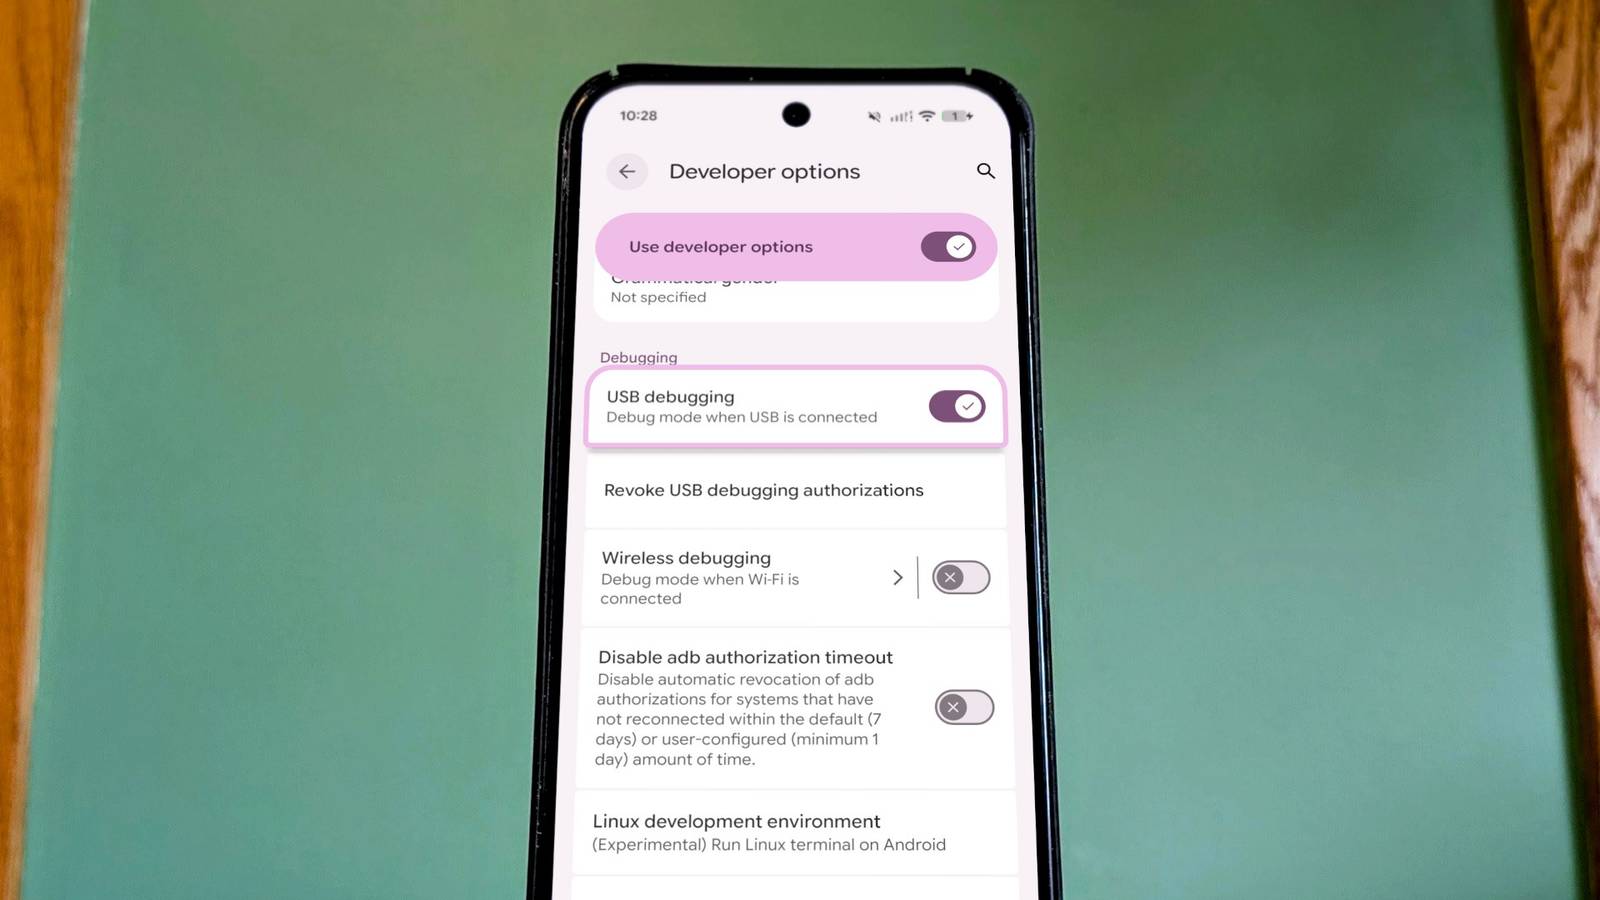
The setting I’m talking about is the innocuously named “USB debugging.” You might think it’s only for people who want to do advanced modding to their phone, but that’s not all it’s good for. USB debugging allows you to access your phone when it’s not working correctly, and that can be incredibly important when it comes to recovering data.
USB debugging is a secret backdoor into your phone
Access your phone when you can’t access your phone
Credit: Lucas Gouveia/How-To Geek
Generally speaking, USB debugging is one of the most commonly used Developer Options. It allows a computer to communicate with your Android phone. Once the two devices are connected, you can control your phone by entering simple commands through the Android Debug Bridge a.k.a. “ADB.”
Why is this useful to the average person? Imagine you drop your phone on a hard concrete sidewalk and the display gets a nasty crack. The phone still powers on, but half the screen is black, and the touchscreen is broken. You’ve got tons of photos, videos, and other important personal data stored on the device, but no way to access it.
Now, plugging your phone into a computer will let you access those photos and videos, but for anything else, you’ll need more advanced tools. If you took the time to enable USB debugging before disaster struck, you can use ADB to fully access your phone from your computer. There are a couple of ways to do this.
Quiz 8 Questions · Test Your Knowledge USB debugging and hidden Android features
Trivia challenge Think you know Android inside and out? Test your knowledge of developer options, ADB, and the secrets hiding in your phone's settings. Developer Options ADB Hidden Settings Android Tips Debugging Begin 01 / 8 Developer Options How do you unlock the Developer Options menu on most Android devices? A Hold the power button and volume down for 10 seconds B Go to Settings, then type 'developer' in the search bar C Tap the Build Number in About Phone seven times D Enable it from the Google Play Store settings Correct! Tapping Build Number seven times triggers a hidden Easter egg that unlocks Developer Options. Android introduced this method to keep advanced settings out of reach for casual users while still making them accessible. Not quite. The trick is to tap Build Number — found under About Phone — exactly seven times. You may be prompted to enter your PIN, and then a message confirms that Developer Options has been unlocked. Continue 02 / 8 ADB What does ADB stand for in Android development? A Android Debug Bridge B Advanced Device Bootloader C Automated Diagnostic Backend D Android Device Broadcaster Correct! ADB stands for Android Debug Bridge. It's a command-line tool that lets you communicate with an Android device from a computer, enabling tasks like installing apps, reading logs, and accessing a device shell. Not quite. ADB stands for Android Debug Bridge. It's part of the Android SDK platform tools and is essential for developers and power users who want deep control over their Android devices via a computer. Continue 03 / 8 USB Debugging What is the primary purpose of enabling USB debugging on an Android device? A To charge the device faster over USB B To allow a computer to communicate with the device for development and diagnostics C To enable file transfer mode automatically when plugged in D To unlock bootloader access without a computer Correct! USB debugging opens a communication channel between your Android device and a connected computer, allowing tools like ADB to run commands, transfer data, and help developers test their apps. Not quite. USB debugging's main purpose is to let a computer communicate with your device through ADB. It's a developer tool, not related to charging speed or automatic file transfer modes. Continue 04 / 8 Hidden Settings Which hidden Android feature lets you see the actual frame rate your screen is rendering in real time? A GPU rendering mode B Profile HWUI rendering C Show GPU overdraw D Keep screen awake Correct! 'Profile HWUI rendering' in Developer Options shows a real-time bar graph overlay that visualizes how long each frame takes to render. It's a great tool for spotting performance bottlenecks in apps. Not quite. The correct answer is 'Profile HWUI rendering.' It displays a live graph at the bottom of your screen showing rendering times per frame, helping developers identify janky or slow UI performance. Continue 05 / 8 ADB Which ADB command would you use to install an APK file onto a connected Android device? A adb push app.apk B adb run app.apk C adb install app.apk D adb deploy app.apk Correct! The command 'adb install app.apk' installs an APK directly to your device from the command line. This is especially useful for sideloading apps that aren't available on the Google Play Store. Not quite. The correct command is 'adb install app.apk.' While 'adb push' does exist and copies files to the device, it doesn't install APKs — it just moves them to a storage location without triggering installation. Continue 06 / 8 Developer Options What does the 'Stay awake' option in Developer Options do? A Prevents the CPU from throttling during heavy tasks B Keeps the screen on whenever the device is charging C Disables the lock screen entirely D Stops background apps from being killed Correct! The 'Stay awake' option keeps the screen from turning off while the device is plugged in and charging. It's handy for developers who need to monitor their app without constantly waking the screen. Not quite. 'Stay awake' specifically keeps the display on while the device is connected to a charger. It doesn't affect the lock screen, CPU behavior, or how Android manages background processes. Continue 07 / 8 Hidden Settings What is the purpose of the 'OEM unlocking' toggle found in Developer Options? A It allows installation of apps from unknown sources B It grants root access to the Android system partition C It permits the bootloader to be unlocked, enabling custom ROMs D It disables Google's device encryption Correct! OEM unlocking allows the device's bootloader to be unlocked through the fastboot tool. This is a prerequisite for flashing custom recoveries and ROMs, but it also trips the device's Knox or similar security flags. Not quite. OEM unlocking is specifically about the bootloader. It doesn't grant root access by itself or change app installation permissions — it simply allows the bootloader to be unlocked via fastboot commands. Continue 08 / 8 Android Tips Which secret dialer code can be used on most Android devices to access a hidden field test or diagnostic menu? A *#0000# B *#*#4636#*#* C ##3282# D *#06# Correct! Dialing *#*#4636#*#* opens a hidden testing menu on most Android devices, showing information about phone status, battery stats, Wi-Fi details, and more. It's one of the most well-known secret Android codes. Not quite. The code *#*#4636#*#* opens Android's built-in testing and diagnostics menu. For context, *#06# displays your IMEI number, which is also useful to know but is a much simpler function. See My Score Challenge Complete Your Score / 8 Thanks for playing! Try Again
How to enable USB debugging on Android
It’s a piece of cake
Enabling USB debugging is an extremely simple process, so let’s just get right to it. First, you need to unveil the hidden Developer Options menu. Open your phone’s Settings, go to “About Phone” and look for “Build number.” Tap the build number repeatedly until a message says "You are now a developer!"
With that out of the way, back out to the main Settings and go to “System.” You should now see a new “Developer options” section—go there and toggle on “USB debugging.” That’s all there is to it, but don’t skip the next step.
In order to access your phone from your computer, you’ll need to tell your phone to trust it. This only needs to be done once, but it needs to be done while you can still use your phone. An easy way to trigger this menu is to connect your phone from the Android Flash Tool website. You can disconnect after selecting “Always allow from this computer” on your phone.
Grab data from your phone through your computer
Say hello to Scrcpy
The easiest way to move data off your phone would be to simply use your phone, right? Since that might not be possible, the next best thing is to remotely use your phone. That’s what an incredibly cool tool called “Scrcpy” enables. It beams your Android’s screen to your computer, where it can be controlled with a mouse and keyboard.
See, even when the physical display and touchscreen are busted, as long as the phone can be powered on, Android is still running just out of view. Scrcpy allows you to see it on your computer screen. You don’t even have to set it up beforehand—it can all be done from your computer after The Bad Thing happens to your phone.
Find instructions here for downloading and installing Scrcpy. Once you have it all set up, there are a multitude of options for recovering your data. You can send files to your computer with Quick Share, move stuff into a cloud storage app, trigger a device backup, or whatever you wish you could do with the device if it were working.
Related Every Android Developer Option Explained Modern Android phones hide a menu called Developer Options. Most people never touch it. But if you've ever wanted to understand what your phone is doing under the hood, this is where you look.
Be ready for disaster
The big thing to take away from this article is to take the time to enable USB debugging and trust a computer before you wish you had. Everything else can be done afterward, but those two steps must be finished while your device is usable. Hopefully, you never have to worry about using it, but you’ll be happy you took the time if something bad happens to your phone.